Measuring things precisely is an important skill in many areas of life. From woodworking and construction to sewing and cooking, getting accurate measurements allows you to cut materials to the right size, join components properly, and get proportions correct when following recipes.
One potential hurdle when taking measurements is reading the fractions on a tape measure. If you’re not comfortable with fractions, those little hash marks between the whole numbers can seem confusing. Thankfully, there are some simple ways to make sense of pictures of tape measure’s fractional markings.
In this guide, I’ll explain what the fractions on a tape measure mean and how to read them. You’ll learn how to take measurements using inches and fractions of an inch. I’ll also give tips on how to use a picture of a tape measure when you don’t have the real thing handy.
With the help of clear illustrations and easy-to-grasp explanations, you’ll gain confidence in your measuring abilities. Let’s get started!
Understanding the Markings on a Tape Measure
Before diving into fractions, it’s important to understand the basic markings found on a standard tape measure.
Most tape measures used for DIY, crafting, and construction projects in the United States are divided into inches. Inches are marked by the longer lines you see numbering up from 0.
Between each inch is a set of smaller marks. These indicate fractions of an inch. Let’s take a closer look:
On this tape measure, you can see the whole inch numbers marked from 0 to 6 inches. Between the 1-inch and 2-inch marks are smaller measurements dividing the inch into quarters and eighths.
This is how all tape measures show fractions – by splitting an inch into smaller fractional segments. Typically, the fractions you’ll see are:
- Halves – Dividing an inch into 2 equal parts
- Quarters – Dividing an inch into 4 equal parts
- Eighths – Dividing an inch into 8 equal parts
- Sixteenths – Dividing an inch into 16 equal parts
Some specialized tape measures may also show 32nds or 64ths for extra precision. But halves, quarters, eighths, and sixteenths are the most common.
Now that you understand what those fractional markings represent, let’s look at how to read them.
Reading Half Inches
Half inches are the largest fractional division on most tape measures. Let’s see how they work.
As you can see in the picture, the half-inch marks are indicated by longer lines between the inch numbers.
To read them, you simply say “one and a half inches,” “two and a half inches,” and so on.
The half marks essentially divide the inch in between in half. So the one-and-a-half-inch mark is halfway between the 1 and 2. The two-and-a-half-inch mark falls halfway between 2 and 3.
Reading measurements with half inches is straightforward. You simply combine the number of whole inches with “and a half.” Give it a try on your tape measure!
Reading Quarter Inches
Now let’s move on to quarter inches. Here’s how they work:
The quarter-inch marks divide each inch into four equal lengths. You’ll notice there are 3 quarter-inch marks between each number because that’s how many marks are needed to split the inch into quarters.
To read these measurements, you say the whole number plus “and a quarter.” For example, the first mark past the 2 is read as “two and a quarter inches.”
The next quarter-inch mark would be “two and a half inches” – you’re now up to the halfway point. Then “two and three-quarters inches”, which takes you to the last quarter mark before the 3.
Reading quarter inches gives you more precision than just using whole numbers. With a little practice, you’ll get the hang of translating those fractional marks into measurement calls.
Reading Eighth Inches
Now let’s dive into eighth inches. These are a bit trickier but follow the same principle:
Eighth-inch markings divide each inch into – you guessed it – eight equal segments. Since there are 8 marks between the whole inch numbers, you can split each inch into eighths.
To read these measurements, you combine the whole number with “and __ eighths.” So the first mark past the 5 is read as “five and one-eighth inches.”
The next mark is “five and two-eighths inches”, then “five and three-eighths,” up to “five and seven-eighths.” The last eighth-inch mark before the 6 is read as “five and seven eighths.”
Eighths allow for very precise measurements, down to just 1/8th of an inch. With some practice, you’ll be able to quickly translate those tiny marks into proper fractional measurements.
Reading Sixteenth Inches
Some specialized tape measures show sixteenths of an inch. Here’s how those work:
As you can see, there are now 16 tick marks between each whole inch number, letting you divide an inch into 16 equal parts.
The way you read these fractions is similar to eighths, except using “sixteenths” instead. So the first mark past the 3 inches would be “three and one-sixteenth inches.”
The next mark would be “three and two sixteenths inches,” and so on, until you reach “three and fifteen sixteenths inches” right before the 4 inches.
Sixteenth inch measurements allow for incredibly precise handyman work. But for most basic home DIY projects, eighths or quarters will be sufficient. Use sixteenths for specialty work requiring meticulous accuracy.
Tips for Reading Fractions on a Tape Measure
With practice, reading fractional tape measure markings will become second nature. But here are some tips to help you master it faster:
- Say the measurements out loud – Verbalizing the fractions helps reinforce how to read them properly.
- Try different starting points – Don’t just practice from 0. Start at different inch numbers and work up and down from there.
- Use a ruler’s edge to focus – Align the edge of a ruler with the markings to isolate the fraction you’re reading.
- Double check the inch number – Confirm which set of inch markings you’re working between to call the fraction accurately.
- Take it slowly – Move your finger slowly across the fractions and read them one at a time until you get comfortable.
- Enlist a buddy – Have a friend call out fractions and test your reading skills. Making it a game takes away the pressure.
With a logical approach and regular practice, measuring in fractions will soon feel natural. Next, let’s look at how to take measurements using a photo or picture of a tape measure.
Using a Picture of a Tape Measure for Measurements

Sometimes you need to take measurements when you don’t have an actual tape measure handy. In cases like this, you can use a picture of a tape measure to still get accurate readings.
Here are some tips for taking measurements using a photo of a tape measure:
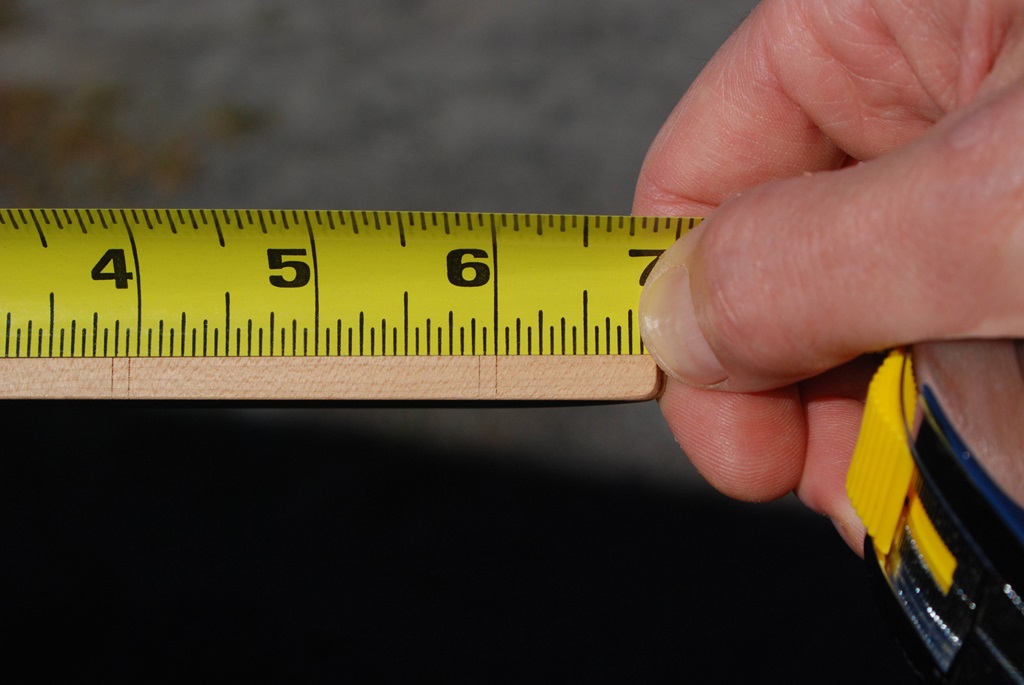
Find a Clear, High-Resolution Photo
The quality of the photo matters. Look for an image that is:
- In focus
- Close up on the tape measure markings
- Large enough to see the inches and fractions clearly
Avoid tiny, blurry, or distorted pictures. The clearer the photo, the easier it will be to read.
This is an ideal tape measure photo to use for measurements. Nice and sharp!
Use a Ruler or Straightedge as a Guide
To take measurements off a picture, use a ruler or straightedge as a guide. Line it up just below the markings on the tape measure photo.
Slide the ruler across to match up with the item you’re measuring. This gives you an accurate reading.
See how the ruler allows you to transfer the measurement from the photo to the item.
Verify Scale for Accuracy
Be sure to verify the photo’s scale to ensure accuracy. Photos can distort size, so check:
- That the inches on the pictured tape measure match the real inches
- That the fraction spacing looks proportional
Compare to a real tape measure or ruler. If anything looks off, try a different picture.
Take Multiple Readings for Consistency
To be extra certain, take two or three readings using different spots on the photo. If your measurements vary, the photo may not be suitable.
With a good quality picture and careful technique, you can take surprisingly reliable measurements from a photo. Just be vigilant about scale and consistency.
Common Measurement Scenarios Involving Fractions
Now that you know how to read those fractional markings, let’s look at some real-world examples. Here are some common situations where fractional measurements come in handy:
Woodworking and Carpentry
Precise cuts are vital in woodworking. Fractions allow carpenters and DIYers to measure lumber and boards to the nearest 1/8 inch or 1/16 inch. This ensures joinery fits together flush and projects assemble square.
Sewing and Crafting
In sewing and crafts like quilting, fractions help add seam allowances and hem garments or fabrics to the ideal width. Taking body measurements for clothing patterns also often involves fractions.
Cooking and Baking
Recipes frequently use fractional measurements for ingredients like 1/2 teaspoon of salt or 1/4 cup of flour. Precise fractions allow cooks and bakers to nail the proportions for delicious outcomes.
There are many other examples, from construction to machining to general DIY home projects. Anywhere exacting measurements are needed, tape measure fractions come in handy.
Helpful Tactics for Measuring with Fractions
Fractions allow for dead-on precision, but measuring and cutting accurately does take practice:
- Use triangles and adjustable squares when possible – They ensure your lines and cuts are perfectly square.
- Cut a little long, then creep up on the line – You can always trim more, but you can’t add length back!
- Mark clearly with sharp pencils, knives, or pens – Clean, crisp marks make for certainty.
- Work slowly and double check – Read measurements twice to verify before cutting.
- Use clamps and jigs to hold work securely – This prevents slippage or inaccuracy.
- Read at eye level – Bending over introduces parallax distortion.
- Check your tape measure’s accuracy – Make sure the whole inches match a ruler or yardstick.
With good habits and techniques, you’ll be able to leverage those fractional markings like a pro.
Conclusion
I hope this guide has demystified using a picture of tape measure with fractions for DIY measuring. The key is understanding what all those fraction marks represent and how to verbalize them properly.
With a good visual guide and regular practice calling out fractional inches, you’ll gain confidence in your measurement abilities.
Precise measuring and cutting is crucial for professional results in carpentry, sewing, crafting, and other skills. Mastery of tape measure fractions allows you to be meticulous in your projects.
So grab a practice tape, use the techniques covered here, and before long you’ll be effortlessly reading down to 1/8, 1/16, or even 1/32 inches.
Good luck with all your DIY measuring adventures! Don’t hesitate to refer back to this guide anytime you need a refresher on those fractional markings. Happy and accurate building, crafting, and creating!
Frequently Asked Questions
Here are answers to some common questions about using a picture of a tape measure with fractions:
How accurate are fractional measurements on a tape measure?
Most standard tape measures are accurate to 1/32 inch on the whole inch markings. The fractions between inches are generally reliable to 1/64 inch or better. Always verify key measurements with a ruler or yardstick.
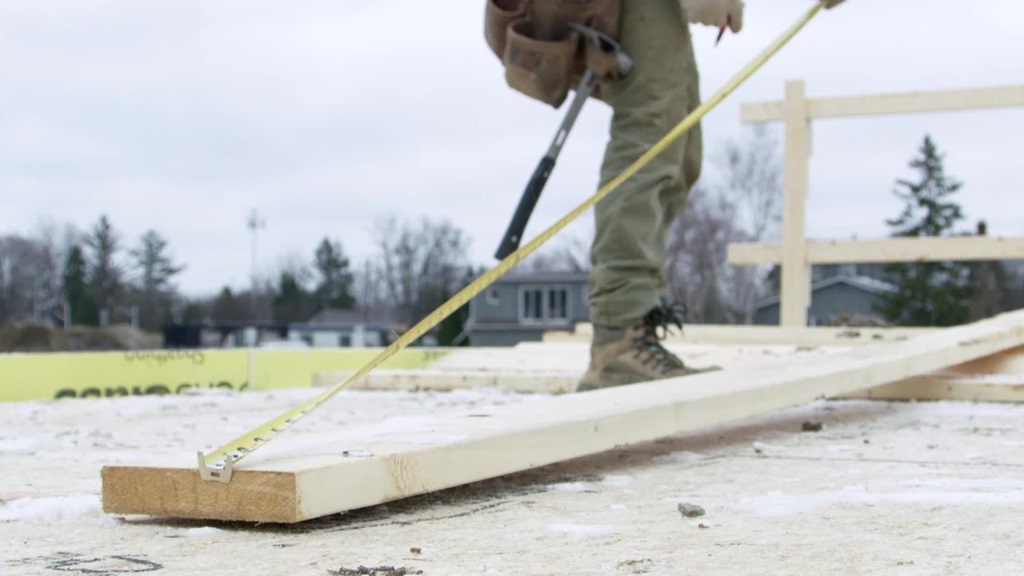
What’s the best way to take fractional measurements by myself?
Use clamps, squares, or another straightedge to hold one end of the tape in place. Stretch the tape across the surface to the measurement point and bend to mark clearly. Avoid eyeballing – use guides for accuracy.
How do I convert fractions into decimal inches?
To convert to decimals, divide the fraction’s numerator by its denominator. For example, 1/2 = 0.5, 1/4 = 0.25, 1/8 = 0.125, etc. An inch calculator app can also simplify conversions.
Should I buy a special fractional tape measure?
Regular fractional tape measures work for most applications. Special ones with just fractions (no whole numbers) are better for machining or projects requiring all fractional measurements.
Why are fractions used instead of decimals on tape measures?
The fraction system dates back centuries and continues mainly for tradition. But fractions are also handy for quick mental dividing. And they allow measurements to readable down to 1/64 inch.