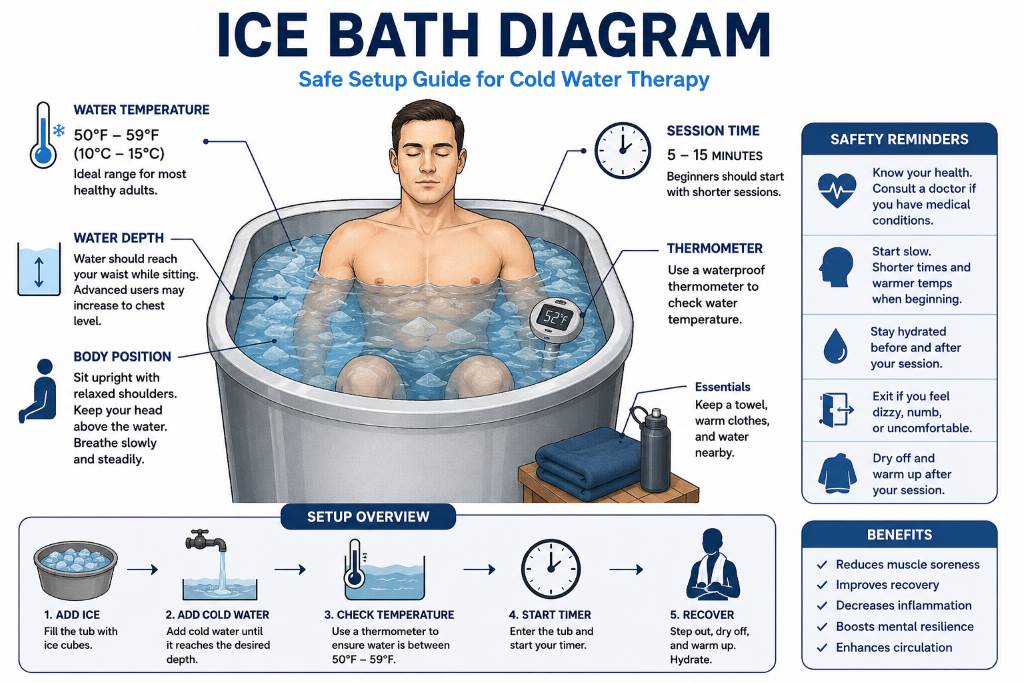
An ice bath diagram shows the correct body position, water level, temperature range, and session timing for safe cold therapy. The best diagram includes water reaching the waist or chest, a temperature between 50°F and 59°F, and a session lasting 5 to 15 minutes for most healthy adults.
Ice baths have become a popular recovery method among athletes and fitness enthusiasts. Research suggests cold water immersion may reduce muscle soreness after intense exercise, while millions of people worldwide now include cold exposure in wellness routines. Understanding an ice bath diagram helps you follow the correct setup and avoid common mistakes. This guide explains every part of the diagram using simple language and practical examples.
What Is an Ice Bath Diagram?
An ice bath diagram is a visual illustration explaining the proper setup for cold water immersion. It labels important parts, including water depth, body position, thermometer placement, and recommended timing.
Most diagrams also include safety notes that prevent avoidable mistakes. Additionally, learning proper bath preparation becomes easier after reading hot mopping shower guide because both require careful preparation.
A well designed diagram removes confusion before entering cold water. Therefore, beginners feel more confident while following each labeled section correctly.
Understanding Every Part of an Ice Bath Diagram
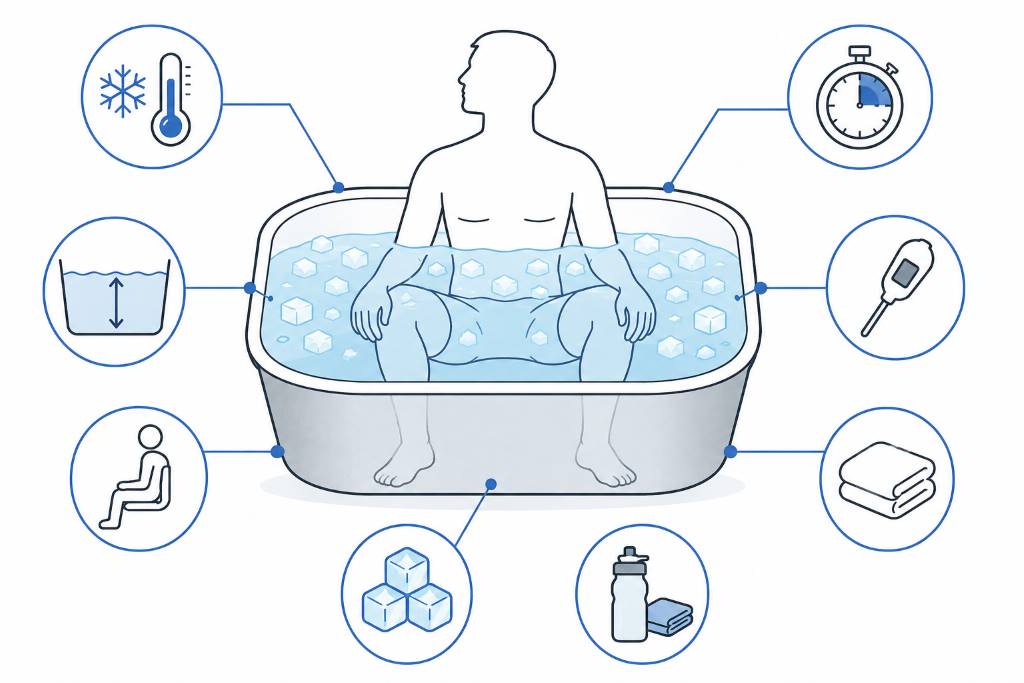
Every quality diagram contains several labeled elements with specific purposes. Understanding each label helps you create a safer and more effective ice bath experience.
Water Temperature
The recommended water temperature usually stays between 50°F and 59°F. This range provides cold exposure without creating unnecessary discomfort for most healthy adults.
Water Depth
The water should normally reach your waist while sitting comfortably. Experienced users sometimes raise the water to chest level for greater body exposure.
Body Position
Sit upright with relaxed shoulders and steady breathing throughout the session. Keep your head above the water unless following supervised cold immersion training.
Timer
Most diagrams include a timer showing five to fifteen minutes. Beginners should always begin with shorter sessions before increasing exposure gradually.
Thermometer
A waterproof thermometer measures water temperature before entering the tub. Accurate readings help maintain consistency during every recovery session.
Example Ice Bath Diagram Layout
The following example explains how a simple diagram is typically organized. Meanwhile, comfort during recovery improves when you understand use bath salts without bathtub for alternative relaxation methods.
- Ice cubes placed evenly around the tub.
- Cold water filling the tub to waist or chest height.
- Thermometer floating near the body.
- Timer positioned outside the tub.
- Person sitting upright with relaxed posture.
- Head remaining above the water.
- Towel and warm clothing placed nearby.
This layout keeps everything organized before starting the session. As a result, users spend less time adjusting equipment after entering cold water.
How to Read an Ice Bath Diagram Correctly
Reading an ice bath diagram becomes simple after understanding each visual marker. Likewise, planning any bathroom upgrade feels easier after exploring bathroom remodeling specialists benefits for safer home improvements.
Start by checking the recommended temperature shown on the illustration. Next, compare your water depth with the labeled measurement before entering.
Afterward, identify the suggested sitting position shown by the body outline. Finally, follow the timer recommendation displayed beside the tub illustration.
Benefits of Following a Proper Ice Bath Diagram
A clear diagram improves safety by reducing guesswork during preparation. Furthermore, consistent setup produces similar recovery conditions after every workout.
- Improves preparation before entering cold water.
- Reduces common beginner mistakes.
- Encourages consistent recovery habits.
- Supports accurate temperature monitoring.
- Helps users maintain proper posture.
- Makes instructions easier to remember.
Following a structured diagram creates confidence during every session. Consequently, users focus more on breathing instead of correcting setup mistakes.
Common Ice Bath Diagram Mistakes
Many diagrams found online miss important safety details. Therefore, checking reliable information remains important before starting cold exposure.
- No thermometer shown.
- Incorrect water depth labels.
- Unrealistic temperature recommendations.
- Missing session time guidance.
- Unsafe body positioning.
- No emergency exit advice.
Avoid diagrams that encourage extremely cold temperatures for beginners. Safe progression always delivers better long term results than unnecessary discomfort.
Tips for Creating Your Own Ice Bath Diagram
You can design a simple diagram using paper or digital drawing software. Include only essential labels that improve understanding without creating unnecessary clutter.
- Draw the tub outline.
- Mark recommended water level.
- Add thermometer placement.
- Show proper sitting posture.
- Include session duration.
- Label temperature range clearly.
- Add basic safety reminders.
Your personalized diagram becomes a useful reference before every session. Over time, consistent practice helps reinforce safe recovery habits naturally.
Who Should Use an Ice Bath Diagram?
An ice bath diagram helps beginners understand safe preparation before trying cold immersion. Athletes also use diagrams to maintain consistent recovery routines after demanding workouts.
Fitness coaches often include diagrams during training sessions for easier instruction. Additionally, wellness enthusiasts appreciate clear visuals that simplify complex recovery techniques.
However, people with certain medical conditions should consult a healthcare professional first. Professional guidance always comes before following any recovery routine involving cold exposure.
Final Thoughts
An accurate ice bath diagram serves as a practical guide for safe and effective cold therapy. Every labeled element supports better preparation, improved consistency, and greater confidence during recovery sessions.
Use the information from this guide before creating your next ice bath setup. Save this article, share it with others, and apply these safety practices every time you use cold water immersion.
Frequently Asked Questions
What temperature should an ice bath diagram show?
The recommended range is generally between 50°F and 59°F.
How long should I stay in an ice bath?
Most healthy adults stay between five and fifteen minutes.
Should my head stay underwater?
No, your head should remain above the water during standard ice baths.
Can beginners follow any ice bath diagram?
No, beginners should only use diagrams with clear safety instructions.
Why is an ice bath diagram useful?
It helps users prepare correctly while reducing common setup mistakes.