Are you looking to add a touch of creativity and uniqueness to your jewelry collection? Why not try your hand at making spoon rings? This DIY project allows you to transform ordinary spoons into stunning, one-of-a-kind rings that will not only make a statement but also serve as a conversation starter. In this guide, I’ll walk you through how to make spoon rings, from selecting the proper spoons to polishing your final masterpiece. So, roll up your sleeves and dive into the world of spoon ring crafting!
What You’ll Need
Before we jump into the crafting process, let’s gather all the essential materials and tools you’ll need to make your own spoon rings:
- Spoons: Look for vintage or antique silver-plated spoons for that classic look. Thrift stores, flea markets, or even your grandma’s kitchen are great places to find them.
- Safety Equipment: Always prioritize safety. Wear safety goggles and gloves to protect your eyes and hands when working with tools.
- Workbench or Solid Surface: You’ll need a stable surface to work on. A workbench or a sturdy table will do the job.
- Vise: A vise will hold the spoon securely in place, allowing you to work on it with precision.
- Hacksaw or Metal Cutting Shears: These tools will help you cut the spoon to the desired length.
- Metal Files: Metal files are essential for shaping and smoothing the edges of the cut spoon.
- Ring Mandrel: This tapered metal rod will be used to shape the spoon into a ring.
- Hammer: A small hammer will be handy for shaping and flattening the spoon.
- Pliers: Both needle-nose and flat-nose pliers will come in handy for bending and adjusting the spoon.
- Sandpaper: Various grits of sandpaper (from coarse to fine) will be used for smoothing and polishing.
- Polishing Compound: To give your spoon ring a brilliant shine, you’ll need a polishing compound.
- Cloth or Buffing Wheel: This will help you buff and polish your ring to perfection.
Now that you’ve gathered your supplies, let’s create your beautiful spoon ring.

Step 1: Selecting the Right Spoon
The first step in making a spoon ring is choosing the perfect spoon. Here’s what you should keep in mind:
Vintage Charm or Modern Chic?
Decide whether you want a vintage or modern look for your ring. Vintage spoons, often featuring intricate patterns and designs, can add a touch of nostalgia to your accessory. On the other hand, modern stainless steel spoons offer a sleek and contemporary appearance. The choice is yours!
Material Matters
Most spoon rings are made from silver-plated or stainless steel spoons. Silver-plated spoons provide that classic, timeless feel, while stainless steel is more durable and easy to work with. Be sure to check the markings on the spoon to determine its material.
Size and Style
Consider the size and style of the spoon. Larger spoons will yield chunkier rings, while smaller ones will result in daintier designs. Additionally, the spoon’s handle design will influence the final look of your ring. Choose a style that resonates with your personal taste.
Step 2: Preparing the Spoon
Once you’ve selected your spoon, it’s time to prepare it for transformation. Follow these steps:
1. Cleaning and Polishing
Give your chosen spoon a good clean with warm, soapy water to remove any dirt or tarnish. If you’re using a vintage spoon, it might benefit from some silver polish to restore its luster.
2. Marking and Measuring
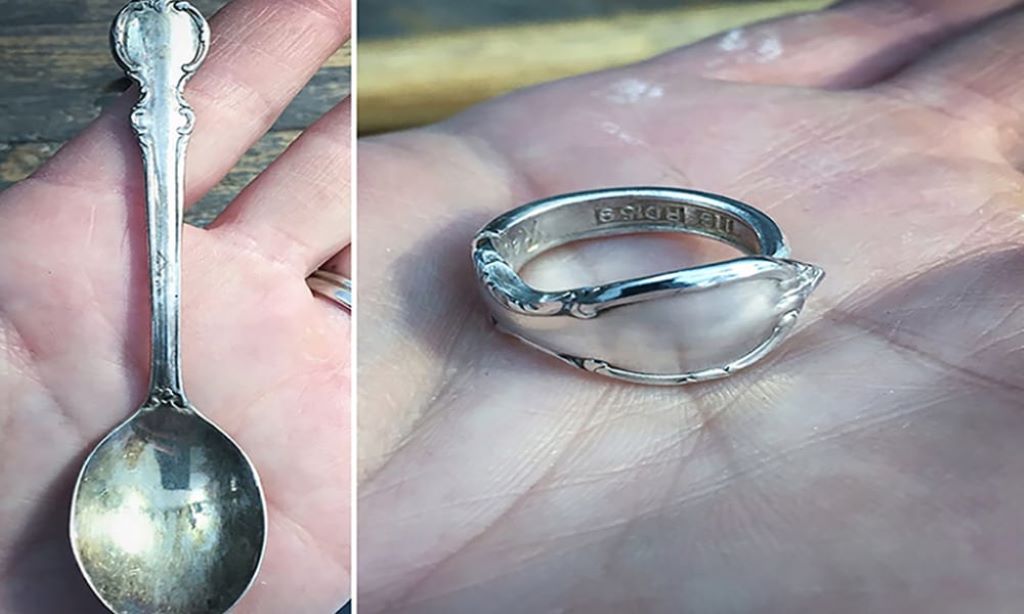
Decide where you want to cut the spoon to create the ring. Typically, this is done just above the bowl of the spoon, leaving the handle as the ring band. Use a marker or masking tape to mark the cutting point. Measure the size of your finger or the finger of the person who will wear the ring to ensure a proper fit.
Step 3: Cutting the Spoon
Now, it’s time to get hands-on with your spoon. Follow these steps to make a clean cut:
1. Secure the Spoon
Place the spoon securely in a vise, ensuring that the marked cutting point is exposed and easy to access.
2. Cutting Tools
Using a hacksaw or metal cutting shears, carefully cut along the marked line. Go slowly and steadily to ensure a straight cut.
3. File the Edges
After cutting, you’ll likely have sharp or uneven edges. Use metal files to smooth and shape the edges until they are even and comfortable to wear.
Step 4: Shaping the Ring
With the spoon cut and the edges smoothed, it’s time to shape it into a ring. Here’s how:
1. Bend the Spoon
Hold the spoon handle firmly with your flat-nose pliers and gently bend it around a ring mandrel to create the basic ring shape. The mandrel will help you achieve a consistent size.
2. Adjust the Fit
Check the fit on your finger, and use your pliers to make any necessary adjustments. You can bend the ring tighter or stretch it slightly to achieve the desired size.
Step 5: Flattening and Smoothing
Now that you have a basic ring shape, let’s make it sleek and comfortable to wear:
1. Flatten the Ring
Use a small hammer to flatten the ring against the mandrel gently. This will give it a smoother, more uniform appearance.
2. Smooth Out Imperfections
Inspect the ring for any irregularities or rough spots. If you find any, use your metal files to smooth them out.

Step 6: Sanding and Polishing
To make your spoon ring shine like a gem, follow these steps:
1. Sandpaper Gradation
Begin with coarse sandpaper and gradually move to finer grits. Start with around 120-grit and work your way up to 400-grit or higher. Sand the entire ring’s surface to remove any scratches or imperfections.
2. Buff with Polishing Compound
Apply a small amount of polishing compound to a soft cloth or buffing wheel. Buff the ring’s surface thoroughly to bring out its shine. Be patient, as this step can take some time, but the result is worth it.
3. Final Polish
Use a clean, dry cloth to give your spoon ring a final polish. Admire the brilliance of your handcrafted creation!
Step 7: Personalize Your Ring (Optional)
If you want to add a personal touch to your spoon ring, consider these creative options:
1. Engraving
Engrave a special message, date, or name on the inside or outside of the ring for a personalized touch.
2. Gemstones
Set a small gemstone in the ring’s bowl or even on the handle for a touch of sparkle.
3. Oxidize or Patina
Experiment with oxidizing agents or patina solutions to give your ring an antique or rustic look.
FAQs
- Can I make spoon rings from any spoon?
While you can technically make spoon rings from various types of spoons, silver-plated and stainless steel spoons are the most common choices. Silver-plated spoons provide a classic look, while stainless steel is durable and easy to work with.
- Do I need any prior experience in jewelry making to create spoon rings?
No, you don’t need prior jewelry-making experience to make spoon rings. This DIY project is beginner-friendly, and you can learn as you go. Just be sure to follow safety precautions when working with tools.
- Can I resize a spoon ring if it doesn’t fit?
Yes, you can resize a spoon ring if it doesn’t fit properly. Use pliers to bend the ring to the desired size carefully. Remember that resizing may require some practice to get the fit just right.
- How can I maintain the shine of my spoon ring over time?
To maintain the shine of your spoon ring, store it in a dry, airtight container to prevent tarnishing. Avoid exposing it to harsh chemicals, and periodically clean it with a silver polishing cloth or a jewelry cleaning solution.
- Where can I find unique spoons for making spoon rings?
You can find unique spoons for making spoon rings at thrift stores, flea markets, antique shops, or even in your kitchen. Look for spoons with attractive designs or patterns to add character to your creations.
In conclusion
Crafting your spoon rings is a delightful and rewarding DIY project that allows you to express your creativity and make unique accessories. DIY home decorating tips: With the right materials, tools, and a little patience, you can transform ordinary spoons into eye-catching pieces of jewelry. So, why not give it a try and enjoy the satisfaction of wearing a ring that you’ve crafted with your own two hands, adding a unique and personalized touch to your home decor? Happy crafting!


